Astrophotography: A How To Guide
Astrophotography can seem intimidating from the outside. Between tracking mounts, complex editing workflows, and photos of dark
skies, it’s easy to assume you need thousands of dollars of gear and years of experience before you can point a camera toward the night sky. The truth is that some of the most rewarding astrophotography images are also some of the simplest. If you have a camera, a tripod, and a clear night, you already have everything you need to get started.
Some of my favorite experiences with a camera have happened long after the sun disappeared. There’s something
special about standing beneath a sky full of stars, watching your camera reveal details that our eyes can’t quite see. The first time you capture the night sky, it feels a little bit euphoric. Thankfully, getting there is often much easier than people expect. Let's dive into the behind the scenes of astrophotography.
The first thing to focus on is finding dark skies. You can have the best camera in the world paired with the best lens, but city lights will
always make astrophotography more difficult. Whenever possible, try to get away from major population centers and look for locations with minimal light pollution. Apps like Dark Sky Finder or Clear Outside can help you plan ahead and identify locations with favorable conditions. Moon phase also plays a major role. While a full moon can create beautiful nighttime landscapes, a new moon will allow the stars, constellations, and the Milky Way to shine much brighter.
Once you’ve found a dark location, stability becomes your best friend. Exposing for dark skies require longer shutter speeds, which
means even the slightest movement can soften your images or create unwanted star trails. A sturdy tripod is one of the most important investments you can make. Something like ProMaster's Epoch is ideal because it remains stable while still being easy to carry into remote locations, and its four-way head means that making slight adjustments for your scene a breeze. The less you have to think about your gear, the better off you are. Epoch has been my go-to for nearly three years now.
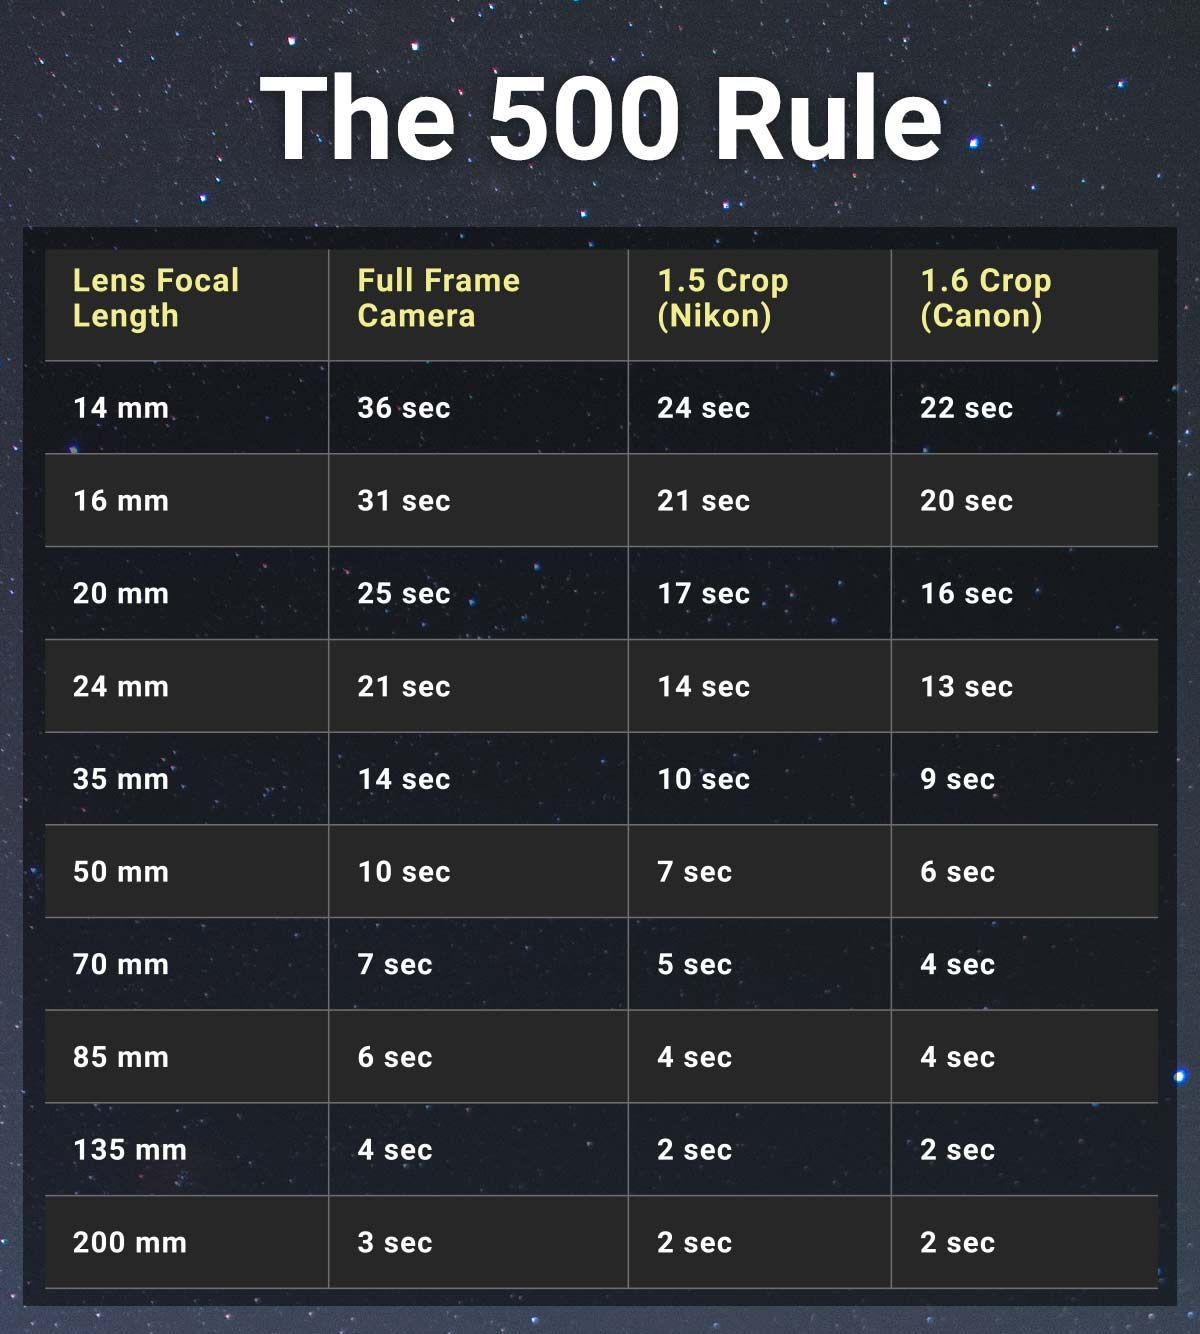
Camera settings are often where new astrophotographers get overwhelmed, but they don’t have to be. A good starting point is to
shoot in manual mode with your aperture as wide as possible, your ISO between 1600 and 6400, and your shutter speed somewhere between 10 and 20 seconds. Every camera and lens combination is a little different, so don’t be afraid to experiment. Modern cameras handle high ISO values remarkably well, and it’s often better to accept a little noise than to miss the shot entirely. To expand on the talk of shutter speed, the 500 Rule is a great place to see what your lens' limit is. The chart below can be a useful tool to see what the maximum shutter speed you can achieve before getting star trails.
Speaking of lenses, wider is almost always better. A wide-angle lens allows you to include more of the sky while also keeping
exposure times manageable before stars begin to trail. Fast lenses with apertures of f/2.8 or wider can make a noticeable difference, but don’t feel like you need the most expensive option available. Great astrophotography images are far more dependent on location, timing, and technique than they are on owning the newest gear. Fun fact: my first astro lens I ever bought I paid $150 for and purchased it used.
To pair with your wide-angle lens, having a protective filter on the front is a piece of gear that is often overlooked. I've learned the
hard way in the past, but there is nothing worse than shooting late into the night and you're dealing with condensation on the lens from a lack of humidity. It makes a huge difference to have some high quality, moisture repellant glass in front of your lens element to keep your images clear. My workhorse: ProMaster's HGX series.
Now one of the biggest challenges for new astrophotographers is focus. During the day, autofocus systems do an excellent job, but
once darkness falls, they often struggle to find enough contrast or bright spots to lock onto. Instead, switch your lens to manual focus and find the brightest star or planet visible in the sky. Using your camera’s live view, zoom in digitally as far as possible and slowly adjust focus until that star appears as the smallest, sharpest point of light. It may take a few attempts, but once you nail focus, you’ll be amazed at how much detail appears. Before moving locations, it’s always worth checking focus one more time. Nothing is more disappointing than getting home after a successful night under the stars only to discover every image was just slightly soft. Trust me - I've been there.
Finally (and most importantly), don’t forget to simply enjoy the experience. It’s easy to get caught up in settings, sharpness, and
technical perfection, but astrophotography offers something many other genres don’t:
a reason to slow down. While your camera is exposing for fifteen seconds, you’re standing beneath a sky that has looked largely unchanged for thousands of years. That’s a pretty remarkable experience to witness. At the end of the day, astrophotography isn’t about having the perfect setup. It’s about preparation, patience, and curiosity. Find a dark sky, bring a stable tripod, pack a few extra batteries, and give yourself time to experiment. The stars aren’t going anywhere, and every night under them is another opportunity to create something you're proud of.
Recent POsts